Bifold doors are an excellent choice for adding functionality and style to your space. Whether you are installing them in closets, pantries, or laundry areas, their space-saving design and sleek look make them a go-to solution.
Installing bifold doors can quickly become frustrating if they don’t align properly or if trimming leaves uneven edges. Missteps during the process can lead to squeaky movement, unsightly gaps, or even costly rework—problems no professional wants to face.
But what if you could avoid these pitfalls entirely? This guide offers a straightforward, professional approach to installing and trimming bifold doors with precision and ease. By the end, you will have the confidence and know-how to transform any space with doors that are as functional as they are stylish.

Why Would You Need to Trim Bifold Doors?
Trimming down bifold doors refers to the process of cutting or resizing the doors to fit within a specific opening when the standard-sized doors are too large or uneven for the space. This step is often necessary in
- Uneven Opening Dimensions: If the height or width of the door frame is slightly smaller than that of the bifold doors, trimming ensures a proper fit.
- Floor Leveling Issues: In older buildings or areas with uneven floors, trimming the bottom of the doors ensures smooth operation and prevents dragging.
- Custom Installations: Some installations, such as retrofitting into a non-standard opening, may require modifications to standard door sizes
- Aesthetic Alignment: Trimming helps achieve even gaps and a polished look, especially in professional installations where precision is essential.
Pro Tip: Always trim the bottom edge of the door to maintain the factory-finished appearance on the top and sides. Trimming should be done with the proper tools, such as a circular saw or jigsaw, to ensure clean, straight cuts.
Tools and Materials for Bifold Door Installation and Trimming
A well-prepared workspace is essential for efficient installation. Ensure you have the following:
| Category | Tools and Materials | Professional Tips |
| Tools | Measuring tape | Use a metal measuring tape for precise dimensions; avoid fabric or flexible tapes for critical accuracy. |
| Drill and drill bits (pilot holes, hardware installation) | Choose carbide-tipped bits for durability, especially when working with hard materials like composite. | |
| Screwdriver (manual or power) | A cordless power screwdriver can save time on larger installations. | |
| Circular or hand saw (for trimming) | Opt for a fine-toothed blade to achieve smooth, clean cuts on wood or composite doors. | |
| Level (bubble or laser) | A laser level ensures alignment across longer spans for multi-panel bifold doors. | |
| Utility knife (for shims or minor adjustments) | Keep spare blades handy for consistent performance. | |
| Hammer | Use a rubber mallet for precise adjustments without damaging delicate finishes. | |
| Sandpaper or sanding block | Medium-grit sandpaper (120-150) is ideal for smoothing trimmed edges. | |
| Materials | Bifold door kit (including track and hardware) | Confirm all components are included in the kit; missing parts can delay installation. |
| Screws and fasteners (typically included in the hardware kit) | Use corrosion-resistant screws for long-term durability in humid environments. | |
| Wood shims | Keep extra shims available for aligning uneven frames or adjusting pivot brackets. | |
| Anchors (for drywall mounting) | Select anchors rated for the door’s weight to ensure a secure installation. | |
| Paint, primer, or stain (if finishing is required) | Use quick-drying, professional-grade products for efficient finishing on-site. |
Pro Tip: Always inspect the bifold door kit to confirm that all components, such as the track, pivot pins, and hardware, are included before starting.

Steps to Install and Trim Your Bifold Doors
Installing and trimming bifold doors requires careful preparation, technical precision, and the right tools. These steps will ensure a professional finish that ensures long-term durability and functionality.
1. Prepare the Opening
The first step to installing bifold doors is ensuring the door opening is ready. An uneven or improperly measured frame can cause alignment issues later.
Start by measuring the width and height of the opening. Take measurements at multiple points (top, middle, and bottom for width; left, center, and right for height) to account for any irregularities. If the frame isn’t square, use a level to confirm where adjustments are needed.
To fix an uneven frame:
- Insert wood shims where necessary to create a uniform, level surface.
- Double-check the alignment after adjustments.
Lastly, clear the area of any old hardware, debris, or obstacles to create a clean workspace for the installation.
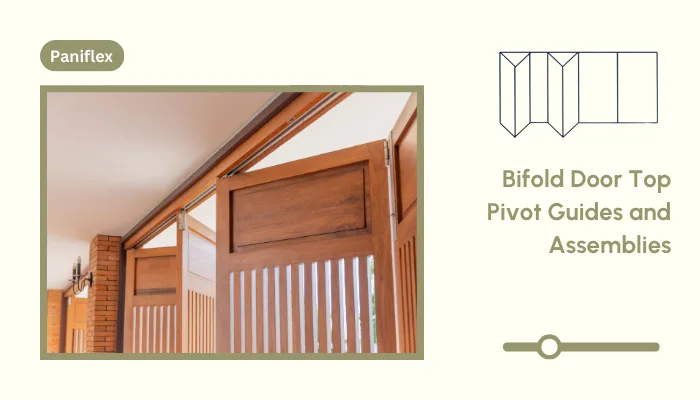
2. Install the Top Track
The top track is crucial for guiding the doors smoothly. Begin by positioning the track inside the top of the frame, centered for even spacing on both sides. Use a pencil to mark the locations where screws will secure the track.
Drill pilot holes to prevent splitting the frame, then attach the track with screws provided in the hardware kit. Be sure to use a level during this step to ensure the track is perfectly horizontal. Misalignment at this stage can lead to operational problems later.
3. Attach Pivot and Guide Brackets
Pivot and guide brackets provide stability and control for bifold doors.
- Start with the top pivot bracket, securing it at the edge of the track where the pivot door panel will anchor.
- Attach the bottom pivot bracket directly below the top bracket, aligning it with the track.
- Place the guide bracket at the track’s center to support the non-pivoting door panel.
Tighten all screws securely to ensure the brackets can handle the door’s weight and movement.
4. Hang the Doors
Now, it’s time to hang the doors. Begin by sliding the top pivot pin into the top pivot bracket. Next, insert the bottom pivot pin into the floor bracket, ensuring the door hangs vertically. Lastly, secure the guide pin into the track’s center guide.
Adjust the pivot pins to align the doors with the frame, using a level to confirm everything is straight. Smooth door movement at this stage is a good indicator that the installation is progressing correctly.
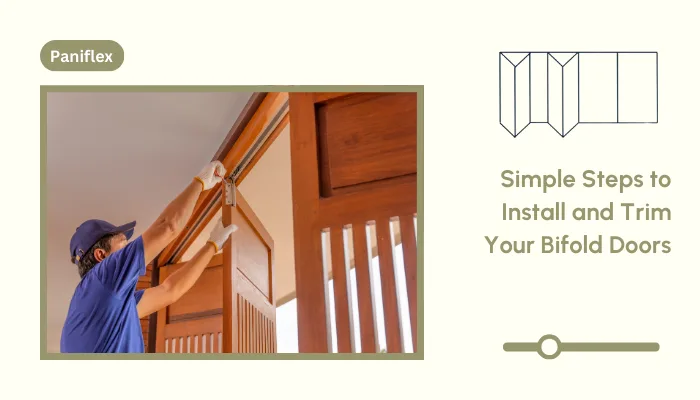
5. Trim the Doors
If the bifold doors don’t fit perfectly within the opening, you may need to trim them. Measure how much material needs to be removed, then mark the area to be trimmed with a straightedge. Always trim from the bottom edge to preserve the door’s factory finish on the top.
Use a circular saw with a fine-toothed blade for precise, clean cuts. Sand the trimmed edges to smooth out any splinters or rough spots, ensuring a professional appearance.
6. Adjust and Secure the Doors
After hanging the doors, adjustments ensure they open and close smoothly.
- Check for even gaps around the frame and between the door panels.
- Adjust the pivot pins to fine-tune alignment and height.
- Tighten all hardware to prevent loosening over time.
Lubricate the track and pivot points with silicone spray to minimize noise and ensure smooth operation.
Pro Tip: For larger projects, such as multi-unit residential developments, using custom doors can significantly improve efficiency and consistency across installations.
7. Add the Finishing Touches
To complete the installation, focus on the final details:
- Attach door handles or knobs at the recommended height for easy operation.
- If the doors are unfinished, apply paint or stain to match the room’s décor.
- Inspect the installation by opening and closing the doors several times to confirm everything functions perfectly.
Following these steps can ensure a seamless installation and a perfect fit for your bifold doors. Proper preparation, precision in execution, and attention to finishing touches make all the difference in delivering a professional-grade result.
Whether resizing or installing standard doors, these techniques provide the foundation for both functionality and aesthetics, setting the stage for a flawless final product.
How Custom Bifold Doors Simplify Installation
Custom bifold doors offer a personalized solution that streamlines the installation process. Designed to fit exact specifications, these doors eliminate many common challenges associated with standard-sized options.
Here’s how custom bifold doors make installations smoother and more efficient:
Eliminate the Need for Trimming
One of the most significant advantages of custom bifold doors is their precision-fit design. Unlike off-the-shelf doors, which often require cutting or resizing to accommodate non-standard openings, custom doors are built to match the exact dimensions of the frame.
- No time spent measuring and trimming.
- Avoid uneven edges or mistakes during resizing.
- Preserve the door’s structural integrity and factory finish.
Save Time During Installation
Custom bifold doors come pre-configured to meet the project’s specific needs, simplifying the overall installation process. With no adjustments required, installers can focus on assembling and securing the doors rather than making on-site modifications.
- Shorter installation timelines.
- Reduced need for specialized tools, such as saws or sanders.
- Lower labor costs for professional projects.
Ensure a Flawless Fit and Operation
Standard bifold doors may struggle with alignment issues, especially in older buildings with uneven frames or floors. Custom doors are designed to account for site-specific conditions, providing a seamless fit that ensures smooth operation.
- Precision-engineered components for perfect alignment.
- Adjustable hardware tailored to the door’s weight and dimensions.
- Compatibility with unique configurations, such as odd-sized openings or multi-panel systems.
Enhance Aesthetics with Perfect Proportions
Custom bifold doors are not just functional—they are designed to integrate harmoniously with the surrounding architecture. By avoiding gaps, uneven edges, or over-trimming, they provide a sleek, professional finish that elevates the overall design.
- Customized panel sizes and configurations.
- Material options (e.g., wood, aluminum, composite) to match the project’s style.
- Pre-finished surfaces that eliminate the need for on-site painting or staining.
Reduce Long-Term Maintenance Needs
Trimming standard doors can compromise their structural integrity, leading to issues like warping, misalignment, or uneven wear over time. Custom bifold doors, on the other hand, are manufactured to withstand regular use without requiring frequent adjustments or repairs.
- Reinforced edges that resist chipping or splintering.
- High-quality hardware designed for the door’s specific dimensions.
- Reduced likelihood of operational issues caused by improper sizing.
By choosing custom bifold doors, you can achieve a perfect balance of functionality and visual appeal while simplifying the installation process. However, the key to this success lies in selecting the right company to craft the door to your exact specifications.
Achieve Flawless Results with Custom Door & Mirror
Installing and trimming bifold doors may seem straightforward, but achieving a flawless finish requires precision, preparation, and the right tools. From proper alignment to thoughtful finishing touches, each step in the process contributes to the overall functionality and aesthetic appeal of the installation. However, trimming and adjustments can be time-consuming and challenging, especially in professional projects where efficiency is key.
At Custom Door & Mirror, we eliminate these challenges by offering custom bifold doors tailored to your exact specifications. Our precision-engineered solutions ensure a perfect fit for any space, saving you time and effort while delivering a superior final product. We offer a wide range of materials, finishes, and configurations to cater to the unique needs of contractors, designers, and architects.
Whether you are managing a large-scale development or a single-room transformation, our custom bifold doors streamline installation and enhance the aesthetic impact of your projects. Let Custom Door & Mirror help you achieve the results you need with minimal hassle.
Schedule a consultation today. Call (631)-414-7725 or use our online form.
Frequently Asked Questions
What adjustments can be made to bifold doors post-installation?
Most bifold doors allow for fine-tuning via pivot and guide pins to address alignment or spacing issues. Regular maintenance, such as lubricating the track and tightening screws, is essential for long-term performance.
How do custom bifold doors improve project timelines for large-scale developments?
Custom doors eliminate the need for on-site trimming or modifications, significantly reducing installation time. This is especially beneficial for multi-unit projects, where consistency and efficiency are critical.
What steps can be taken to ensure minimal maintenance requirements for bifold doors?
Selecting high-quality materials, such as corrosion-resistant hardware and durable finishes, reduces long-term maintenance. Proper installation, including precise alignment and secure fastening, further minimizes wear and tear.