As an interior designer or architect, you know that the devil is in the details. When it comes to doors, understanding rough opening sizes can make or break your project. Ready to master the art of rough opening for 36 door sizes and beyond? Let’s dive in!
Introduction to Door Rough Opening Sizes

Door installation has unsung heroes called rough openings. They ensure proper fit and function, accommodate variations in manufacturing, and allow for adjustments during installation.
Significance of Rough Opening Sizes
Rough openings are crucial for:
- Ensuring proper fit and function
- Accommodating variations in manufacturing
- Allowing for adjustments during installation
Differences Between Interior and Exterior Doors
While both need precise measurements, exterior doors generally require larger rough openings due to:
- Weather-stripping requirements
- Thicker door construction
- Need for additional insulation
Remember, accurate measurements are your best friend for successful installations. A few millimetres can mean the difference between a smooth-swinging door and a sticky nightmare!
Why Rough Openings Are Larger Than the Door
Ever wondered why we can’t just cut a hole the exact size of the door? Here’s why rough openings need that extra space:
- Room for adjustment: Allows for leveling and squaring the frame
- Manufacturer variability: Accounts for slight differences in door sizes across brands
- Material expansion: Wood and other materials expand and contract with temperature and humidity changes
- Wall movement: Houses settle over time, and walls can shift slightly
- Smooth operation: Ensures the door doesn’t stick or rub against the frame
Pro tip: Always add a little extra wiggle room for the perfect rough opening for 36 door sizes. Your future self (and your clients) will thank you!
Standard Rough Opening Sizes
Now that you’re armed with the why – let’s get into the numbers!
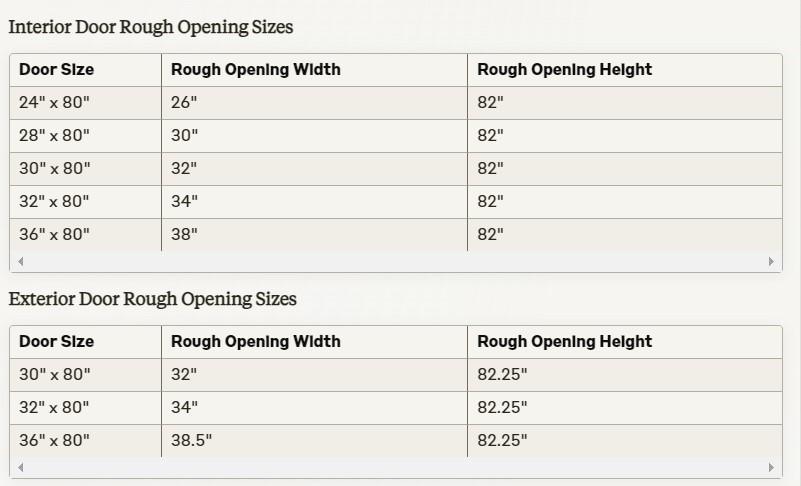
Important note: Your rough opening for a 36-inch exterior door should ideally be 38-1/2 inches by 82-1/4 inches. This extra quarter inch in height can make all the difference!
Installation Tips for Door Rough Openings

Ready for the nitty-gritty? Here’s how to make sure your numbers translate into a seamless installation:
- Pre-hung door frames: Designers often consider these their best friend. They come with the door already hung in the frame, making installation easier and more precise.
- Clearances: Aim for about 1/4 inch clearance on each side and 1/2 inch at the top for shimming and adjustments.
- Squaring up: Use a level and square to ensure your rough opening is perfectly aligned. A crooked opening leads to a crooked door!
- Headers: A proper header should support the load above for exterior doors and wide openings.
- Quick tip: When installing over carpet, shim the door jambs about 3/8″ off the floor. This prevents future headaches when the carpet is installed.
Adjusting Pre-Hung Doors in Imperfect Rough Openings
Think you nailed the rough opening? Let’s see what’s next if you hit a snag:
- Initial fitting: Place the door in the opening and use shims to center it.
- Top jamb check: Use a level to check the top jamb. Adjust with shims as needed.
- Hinge side plumb: Ensure the hinge side is perfectly vertical. This is crucial for proper door operation.
- Latch side adjustment: Once the hinge side is set, adjust the latch side for even gaps.
- Test, test, test: Open and close the door multiple times, making small adjustments as needed.
Understanding Tolerances in Rough Opening Sizes
We all know life isn’t perfect. So, how forgiving can you be with those measurements?
- Typical tolerances: Generally, you can have up to 1/4 inch of play in your rough opening measurements.
- Handling deviations: If your opening is slightly off, don’t panic! Skilled use of shims can often compensate for minor discrepancies.
- Plumb and level: Remember, ‘plumb’ refers to vertical alignment, while ‘level’ is for horizontal. Both are crucial for a well-functioning door.
Conclusion: Mastering the Art of Rough Openings
Feeling more confident about those rough openings? Let’s wrap things up and see how Paniflex can help you take it to the next level!
Understanding rough openings, especially that crucial rough opening for 36 door, is key to successful door installations. But remember, these guidelines are just the starting point. Always:
- Refer to manufacturer instructions for specific requirements
- Check local building codes, as they can vary by region
- Plan and measure accurately to prevent installation issues
Do you want to elevate your door game? Paniflex specializes in custom door solutions that perfectly fit your vision – and your rough openings. Whether you’re working on a sleek modern interior or a grand entryway, we’ve got you covered. Why not explore our range of customizable doors and see how they can complement your next project? Request a consultation today, and let’s create something extraordinary together!


