Hinges are the backbone of a well-functioning bifold door. If installed incorrectly, even the highest-quality doors can suffer from misalignment, uneven folding, or poor operation. Properly mounted hinges ensure that the panels open and close smoothly, reducing strain on the door and preventing long-term issues like sagging or excessive wear.
Bifold doors rely on strategically placed hinges to function correctly. Unlike standard doors, which swing on a single hinge set, bifold doors require multiple hinges to distribute weight evenly across the panels. Poor hinge placement or improper installation can lead to stiff movement, noisy operation, or doors that fail to fold properly.
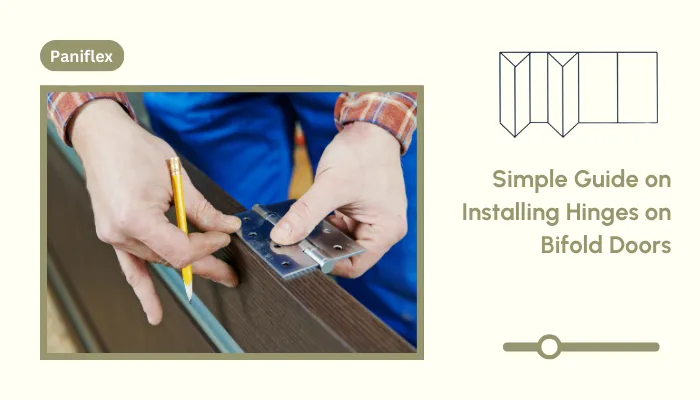
This guide will walk you through the step-by-step process of installing hinges on bifold doors.
Ready to experience the benefits of custom closet doors? Explore our range of Paniflex products now.
Tools and Materials Needed
Before starting the installation process, having the right tools and materials on hand is essential to ensure the job goes smoothly. Using the correct tools not only helps speed up the process but also ensures that each step is performed with precision.
Here is a breakdown of what you will need:
Tools
- Drill: For creating pilot holes to prevent wood splitting and ensuring screws go in securely.
- Screwdriver: To fasten the screws into the hinges with precision. A power screwdriver can make the job faster, but it is not mandatory.
- Measuring tape: For accurate hinge placement and ensuring the correct spacing between hinges.
- Level: To check that the hinges are aligned properly, preventing uneven folding or misalignment.
- Pencil: To mark hinge locations clearly without damaging the door surface.
- Clamp (optional): To hold the door in place while you position and install the hinges.
Materials
- Bifold door hinges: Be sure to choose the right size and weight rating for your specific bifold doors. Standard 3-inch or 4-inch hinges work well for most residential bifold doors.
- Screws: Ensure they match the hinge and door material (wood screws for wood doors and appropriate screws for other materials like MDF or metal).
- Wood filler (optional): For filling in previous screw holes if you are replacing or repositioning existing hinges.
- Shims (optional): This is for adjusting the door alignment if needed during installation.
With the right tools, materials, and techniques, the process becomes straightforward and achievable. The result will be a set of bifold doors that open and close seamlessly.
Recommended Watch: This video demonstrates a simple method for installing door hinges.
Once everything is set up, you can proceed with the installation process, knowing you have everything you need to achieve a flawless result. Every step is crafted to be straightforward and impactful, enabling you to complete a professional-level installation with ease.
Step-by-Step Installation Guide
Bifold doors rely on accurate hinge placement to ensure smooth operation and even folding. A single mistake in the positioning can result in misaligned doors, poor functionality, and increased wear over time.
This section will walk you through the exact steps for installing the hinges on your bifold doors, ensuring the best possible results. Follow these instructions carefully, and your bifold doors will be set up for years of smooth, trouble-free use.
1. Determine the Hinge Placement
The first step in the installation process is determining where to place the hinges on your bifold doors. Proper hinge placement is critical to the door’s overall performance. Incorrect placement can lead to uneven folding, misalignment, and difficulty opening or closing the doors.
Start by measuring and marking the hinge locations on both door panels. Depending on the size of the door, bifold doors typically have two to three hinges. Ensure that the hinges are positioned equidistant from the top and bottom of the door. For better stability, the middle hinge should be centered, while the top and bottom hinges should be placed about 6-8 inches from the door’s edge.
Make sure that the hinges will align with the corresponding hinges on the frame. Use a measuring tape for accuracy, and don’t rush this step—proper hinge placement is vital for smooth operation.
2. Pre-drill Holes for the Hinges
Once you have marked the hinge locations, it’s time to drill pilot holes. Pre-drilling prevents the wood from splintering or cracking when you insert the screws. Choose a drill bit slightly smaller than the screws you plan to use for the hinges.
Position the drill at a right angle to the surface of the door to ensure the holes are straight. Drill the holes at the marked spots, ensuring they are deep enough for the screws to hold securely.
3. Attach the Hinges to the Door Panels
Now that your pilot holes are drilled, it’s time to attach the hinges. Start by aligning the hinge with the holes and securing it with screws. Begin with the center hinge to ensure it holds the door securely, then move on to the top and bottom hinges.
Be cautious not to over-tighten the screws, as this can damage the door material. Tighten the screws until the hinges are flush with the door surface, ensuring they are securely fastened.
4. Connect the Bifold Door Panels
The final step is connecting the door panels. Align the hinges on the second panel with the first one, ensuring they are properly interlocked. After securing the hinges, check the folding mechanism to ensure it works smoothly.
Open and close the doors several times to verify that the hinges are functioning properly. If needed, adjust the hinge placements to ensure that the doors fold without resistance.
Proper hinge placement and installation are key to preventing issues like misalignment or uneven folding in the future. For the best results, check your door movement and adjust it as necessary.
For those seeking high-quality bifold door solutions, Custom Door & Mirror offers a range of top-tier products and hardware designed for durability and ease of installation. If you need professional-grade doors and components for your next project, Custom Door & Mirror has you covered.
From the Community: Are you looking for help replacing bifold door hinges and struggling to find the right ones? If so, this threadmight provide just the guidance you need to solve the issue.
In the next section, we will discuss the common mistakes made during hinge installation on bifold doors and how to fix them.
Common Mistakes to Avoid
The smallest errors in installing hinges on bifold doors can lead to big headaches later. Many people rush through the process or overlook key details that can cause misalignment, poor operation, or even damage to the doors. Avoiding these common mistakes will save you time and effort, ensuring a smooth installation that will stand the test of time.
In this section, we have highlighted some of the most frequent mistakes made during hinge installation and offer guidance on how to avoid them. By paying attention to these details, you will be able to install your bifold doors correctly the first time and enjoy their functionality for years to come.
Uneven Hinge Placement
One of the most common mistakes is misplacing the hinges on the door panels. If the hinges are not evenly spaced, the door will not fold properly, which can lead to uneven wear and a lack of stability.
Solution: Always use a measuring tape and level to ensure the hinges are positioned at equal distances from the top and bottom of the door. Double-check your measurements before drilling to avoid having to reposition the hinges later.
Over-Tightening Screws
While it might seem like tightening the screws as much as possible would be the best approach, over-tightening can actually cause damage to the door material. It can lead to cracks, warping, or difficulty in opening and closing the door.
Solution: Tighten screws firmly, but not excessively. You want the hinge to be secure but not so tight that it stresses the door. Use a screwdriver with a torque setting for more control over the tightness.
Not Pre-Drilling Holes
Some installers skip the pre-drilling step, thinking that the screws will go in just fine. However, without pre-drilling, screws are more likely to cause the wood to split or crack.
Solution: Always pre-drill holes for the screws, especially on solid wood doors. Use a drill bit that is slightly smaller than the screw size to avoid splitting the wood and to create a more secure hold.
Using Low-Quality Hinges
Opting for cheaper, lower-quality hinges can seem like a cost-effective solution, but in the long run, they may lead to performance issues such as squeaking, binding, or failure to support the door properly.
Solution: Choose high-quality hinges made of durable materials like stainless steel or brass. These will ensure smoother operation and longer-lasting functionality and will require less maintenance over time.
Suggested Read: If you are exploring custom options for your closet doors, this article provides valuable insights into the cost of custom doors.
Skipping Alignment Checks
After installing the hinges and connecting the panels, it’s easy to assume everything is in place. However, failing to check alignment before finishing the installation can result in doors that don’t open or close smoothly.
Solution: Always check the alignment of your doors by opening and closing them multiple times. Look for any resistance or rubbing, and make adjustments as necessary.
Avoiding these common mistakes will help you achieve a seamless and successful bifold door installation. Paying attention to hinge placement, screw tightening, and alignment checks can prevent many issues down the road. By taking the extra time to get things right, you can ensure your bifold doors operate smoothly and last for years to come.
If you want to ensure your project goes off without a hitch, Custom Door & Mirror offers the finest hardware and expert solutions for all types of bifold doors. Their range of premium products will help you avoid mistakes and achieve a professional finish every time.
Suggested Read: If you are planning to install interior bi-fold doors, this comprehensive guide is a great place to start. It covers everything from selecting the right door style to the step-by-step installation process.
Ready to experience the benefits of custom closet doors? Explore our range of Paniflex products now.
Conclusion
Installing hinges on bifold doors may seem like a simple task, but attention to detail and precision can significantly improve their performance and longevity. By following the step-by-step process outlined in this guide, you can ensure proper hinge placement, smooth door operation, and long-lasting durability.
For a hassle-free experience and the highest-quality bifold doors and hardware, Custom Door & Mirror is your go-to partner. Their wide range of expertly crafted products and solutions ensures that your projects run smoothly.
Looking for reliable bifold doors and hardware for your next project? Choose Custom Door & Mirror. Our high-quality materials and expert support ensure smooth installations. Contact us to learn more.


