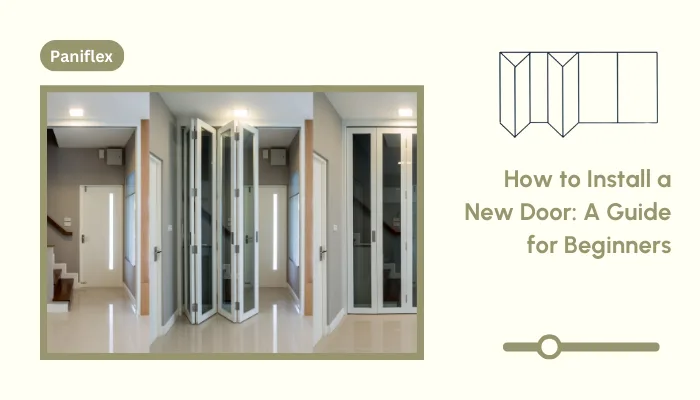
Trackless bifold doors are an excellent choice for professionals seeking a clean, modern finish without compromising functionality. Their design eliminates the need for floor tracks. This makes them perfect for spaces where aesthetics and practicality are equally important.
Installing bifold doors without a track might seem daunting, but with the right approach, it’s surprisingly straightforward. Whether you’re working on a closet, a pantry, or a unique room divider, this guide will walk you through the process.
Why Choose Trackless Bifold Doors?
Traditional bifold doors rely on tracks that can sometimes interfere with your flooring or become a hassle to maintain. By going trackless, you:
- Keep your flooring uninterrupted and sleek.
- Avoid the need for track maintenance or cleaning.
- Enjoy a safer setup with no tripping hazards, especially in high-traffic areas.
It’s a win-win for functionality and aesthetics!
For more insights, consider visiting this community discussion on Reddit.
How to Install Bifold Doors Without a Track

Whether you are working on a custom-designed interior project or outfitting a commercial space, installing bifold doors without a track requires careful planning and execution. Here’s a step-by-step process to ensure your installation is precise and seamless.
If you plan to install a standard door, check out our detailed guide here. It’s packed with helpful tips and instructions to simplify the process!
Make sure you have all your tools and materials ready before you begin. Here’s a quick checklist:
| Tools Needed | Materials Required |
| Drill | Bifold doors (pre-measured for space) |
| Screwdriver | Hinges (spring-loaded or regular) |
| Measuring tape | Top and bottom pivot brackets |
| Pencil or marker | Screws |
| Level | Wood shims (optional for alignment) |
Make sure you have all the tools and materials to avoid interruptions midway through the installation. With everything checked off, here’s how to install your bifold doors.
Step 1: Get the Door Frame Ready
Let’s start with the basics—preparing the door frame. This step is critical because even the most perfectly crafted bifold doors won’t work well if the frame isn’t properly prepped.
Here’s what to do:
- Measure Accurately: Use a tape measure to check the height and width of the frame. Compare these dimensions with the bifold doors to ensure they fit perfectly. If the frame is off by even a fraction of an inch, make the necessary adjustments.
- Inspect the Frame: Check for any irregularities, such as warped wood, uneven edges, or obstructions that could interfere with the doors’ movement. Fix these before proceeding.
- Clean Thoroughly: Remove dust, debris, or leftover construction material. A clean, level surface makes installation much easier.
This initial preparation sets the foundation for a smooth and hassle-free installation.
Step 2: Attach the Top Pivot Bracket
The top pivot bracket is the key to securing your bifold doors. It anchors them to the frame and provides stability during operation. Follow these steps:
- Position the Bracket: Start by aligning the bracket precisely with the edge of the frame. This will ensure stability and proper door movement.
- Mark the Spot: Use a pencil to mark where the screws will go. This ensures the bracket is positioned accurately.
- Secure the Bracket: Drill the screws into the marked spots and ensure the bracket is tightly fastened. Wiggle it gently to confirm it’s stable.
A well-secured pivot bracket ensures the doors move smoothly and remain aligned over time.
Step 3: Secure the Bottom Pivot Bracket
The bottom pivot bracket plays a crucial role in stabilizing the doors, especially in the absence of a floor track. Here’s how to install it:
- Align with the Top Bracket: Place the bottom pivot bracket directly below the top bracket. Use a level to ensure perfect vertical alignment.
- Mark and Drill: Mark the screw holes with a pencil and drill them into place.
- Check Stability: Give the bracket a slight push to ensure it’s firmly anchored.
This step ensures that the doors have a solid foundation, even without a floor track.
Step 4: Attach Hinges to the Door Panels
Now, it’s time to prepare the bifold door panels. Properly attaching the hinges is essential for smooth folding action.
- Lay Panels Flat: Place the panels on a flat, cushioned surface to protect their finish.
- Position the Hinges: Evenly space the hinges along the edges where the panels meet. Three hinges per panel generally work well for most sizes.
- Secure Hinges Firmly: Drill the hinges into place, ensuring they are straight and tight. Misaligned hinges can cause the doors to stick or fold unevenly.
- Double-Check Alignment: Fold the panels to test the hinge movement before proceeding.
Taking the time to get the hinges right will save you from headaches later.
Step 5: Hang the Doors
Here’s where everything starts coming together! Hanging the doors requires precision and care.
- Insert the Top Pivot Pin:
- Align the Bottom Pivot Pin: Guide the bottom pivot pin into the bottom bracket. Double-check that both pivots are aligned correctly.
- Secure and Test: Move the doors gently to ensure they are stable and functioning correctly.
This step might require some patience, but doing it correctly ensures that the doors hang properly and operate smoothly.
Step 6: Align and Adjust
Once the doors are hung, it’s time to fine-tune their alignment.
- Check with a Level: Use a level to confirm that the doors are straight and evenly aligned with the frame.
- Adjust the Brackets: Loosen or tighten the pivot brackets as needed to align the doors perfectly.
- Test the Movement: Open and close the doors to ensure smooth folding and unfolding.
Even small adjustments can make a big difference in the doors’ functionality and appearance.
Step 7: Fine-tune and Add Finishing Touches
The final step in the installation process is all about perfecting the details to ensure your bifold doors look and function flawlessly. Here’s how to wrap up the project with a professional touch:
- Inspect the Doors: Take a close look at the installed doors. Check for any visible gaps, uneven edges, or alignment issues. Even small imperfections can impact the overall look, so address them now.
- Adjust Hinges and Pivots: If the doors don’t fold or close smoothly, make minor adjustments to the hinges or pivot brackets. Tighten any screws that feel loose, and ensure the doors are stable.
- Add Door Handles: If your design includes handles, now is the time to attach them. Measure carefully to position them symmetrically for a balanced appearance.
- Seal or Finish the Frame: If the door frame requires sealing or a finishing coat, complete this step to enhance durability and aesthetics. Match the finish to the surrounding design for a cohesive look.
- Clean the Surface: Wipe down the doors and frame with a soft, lint-free cloth to remove dust or fingerprints. Use a suitable cleaner to achieve a streak-free shine for mirrored or glossy panels.
- Install Optional Accessories: If the doors include additional features, such as soft-close mechanisms or decorative trim, follow the manufacturer’s instructions to install them.
With the steps complete, your trackless bifold doors should be installed and look fantastic. But before you call it a day, a few professional tips can help refine the process and ensure the best results.
Pro Tips for a Smooth Installation
These practical insights will not only make installation smoother but also help you deliver a flawless finish every time:
- Choose Reliable Hardware: Don’t cut corners when it comes to brackets and hinges. High-quality options look better and ensure long-term durability and smooth operation.
- Plan Ahead: Make the installation part of your project timeline. It’s much easier to fit doors into the overall design flow when everyone’s on the same page.
- Measure Twice, Align Perfectly: Precision is everything. Take the time to measure carefully and use a laser level to ensure your doors are perfectly aligned with the rest of the design.
- Work with Your Installers: Share clear specifications and design intent with your installation team. When everyone understands the vision, the result is always better.
- Prepare the Environment: Make sure the space is ready—dry, clean, and climate-controlled—before the doors go up. This avoids any surprises with fit or finish.
These small but impactful steps will help you deliver impeccable installations that align perfectly with your design goals.
Common Problems and How to Fix Them
Even with precise planning and execution, small hiccups can arise during or after the installation of trackless bifold doors. Here’s how to identify and resolve some of the most common challenges:
Doors Not Aligning Properly
- Issue: The doors appear uneven or do not close smoothly.
- Solution:
- Use a level to check if the top and bottom pivot brackets are aligned vertically.
- Adjust the screws on the pivot brackets to fine-tune the alignment.
- Ensure the hinges are evenly spaced and securely fastened.
Difficulty in Folding or Sliding
- Issue: The doors feel stiff or do not fold smoothly.
- Solution:
- Check the hinges for overtightened screws; loosen them slightly if needed.
- Apply a small amount of lubricant to the hinges and pivot pins for smoother movement.
- Inspect for obstructions or debris in the pivot brackets and clean if necessary.
Gaps Between the Doors and Frame
- Issue: Visible gaps create an unfinished look or let light through.
- Solution:
- Adjust the bottom pivot bracket to bring the doors closer to the frame.
- Check the frame for uneven surfaces and use shims to level it out.
- Ensure the doors are correctly measured for the frame size.
Loose or Wobbly Doors
- Issue: The doors do not feel stable or seem to shift when used.
- Solution:
- Tighten all screws on the pivot brackets, hinges, and pivot pins.
- Verify that the pivot pins are properly seated in their brackets.
- Add reinforcements, such as extra screws, if necessary for heavier doors.
Noise During Operation
- Issue: The doors make creaking or squeaking sounds when opened or closed.
- Solution:
- Apply lubricant to the hinges and pivot points.
- Check for misaligned brackets or hinges and adjust them.
- Ensure all hardware components are securely fastened.
Damage to the Door Surface
- Issue: Scratches or marks appear during installation.
- Solution:
- Use a soft cloth and a suitable cleaning solution to remove surface marks.
- For deeper scratches, consider refinishing or touch-up kits provided by the manufacturer.
- Protect the doors during installation by using padded work surfaces.
Achieve Faultless Spaces with Custom Doors & Mirror
Did you know that seamless, trackless designs are among the top-requested features in modern interior projects? If you want to deliver exceptional results, you need the right doors to create an impact. Paniflex (the specialized division of Custom Door & Mirror) is here to help.
With over 60 years of expertise, Paniflex crafts custom bifold doors designed to fit your specifications. Whether it’s flawless floor-to-ceiling integration or sustainable material options, our solutions are engineered for excellence. Our advanced manufacturing processes ensure every detail is crafted with unmatched accuracy. Using cutting-edge technologies like CNC routing and R2D2 software, Paniflex delivers precision down to the nearest quarter inch, guaranteeing a perfect fit every time.
Our doors don’t just look stunning; they’re built to last. Choose from a variety of premium finishes and configurations to meet the unique demands of your projects, from minimalist interiors to complex commercial spaces. With Paniflex, you’re not just choosing doors—you’re choosing a partner committed to delivering on your vision.
It’s time to elevate your designs. Explore Paniflex’s range of custom bifold and sliding doors today and see how we can bring innovation and sophistication to your next project. Schedule a consultation. Drop us an email or call us at (631)-414-7725.


